Sample Aggregator CLI usage #
This page will show you increasing complex examples of using Aggregator CLI.
To run Aggregator CLI type aggregator-cli.exe on Windows, ./aggregator-cli on Linux or dotnet aggregator-cli.dll on any followed by the command and options.
In the examples, we will use aggregator-cli. In PowerShell you can define an alias to exactly match the examples:
Set-Alias aggregator-cli (Resolve-Path .\aggregator-cli.exe)
IMPORTANT: Please avoid naïve copy&paste of the examples, or other user will not be able to run the same. Instance names cannot be duplicated in Azure! At least, delete the Azure Resources, after testing the examples.
Study all three scenarios and try some of the sample commands to make yourself comfortable with Aggregator.
Basic example #
This example shows the basic steps to write and deploy Aggregator Rules. It not intended to represent a more realistic, enterprise-oriented scenario like the Intermediate and the Advanced examples.
This example assumes that the Azure account has Contributor permission on the whole Azure Subscription and also to an Azure DevOps Project.
Logon (basic) #
You are required to log into both Azure and ADO. The credentials are cached locally and expire after 2 hours. (Replace the below asterisks * with valid values.)
aggregator-cli logon.azure --subscription ************ --client ************ --password *********** --tenant ************
aggregator-cli logon.ado --url https://dev.azure.com/youraccount --mode PAT --token ***************************************
Create the Aggregator Instance (basic) #
The Aggregator Instance is an Azure Function Application plus the Aggregator Runtime that execute the Rules.
The next snippet creates a new instance – and a new Azure Resource Group – in the West Europe region.
aggregator-cli install.instance --verbose --name inst1 --location westeurope
Note:
- The Aggregator instance name must be unique in Azure (CLI automatically appends
aggregatorsuffix to minimize the chance of a clash, unless you override using a Naming Template). - You can specify the version of Aggregator Runtime using the
requiredVersionoption. Look in our releases for valid version numbers. - You can use the Azure CLI to get the list of Azure Regions:
az account list-locations -o table. - This is the slowest command: it typically takes a few minutes to create the resources in Azure and upload Aggregator Runtime.
Confirm that the Aggregator Instance is accessible (basic) #
The next command searches the entire Azure Subscription (previously connected to via logon.azure):
aggregator-cli list.instances
It should list inst1.
Add two Aggregator Rules (basic) #
The Aggregator Rule is a special kind of Azure Function.
Write a text file named hello.rule with this content:
$"Hello { self.WorkItemType } #{ self.Id } - { self.Title }!"
Check if the Rule is correct, by running the code locally.
Note that the SampleProject must exists in Azure DevOps while the WorkItem with ID 14 is fake. You can use a different project name.
aggregator-cli invoke.rule --dryrun --project SampleProject --event workitem.created --workItemId 14 --local --source hello.rule
Note that the --source parameter is a local file relative to the working directory.
Even if you skip the above step, the add.rule command will validate the syntax of the code before uploading.
The next snippet adds two rules where the file parameter is a local file relative to the working directory.
aggregator-cli add.rule --verbose --instance inst1 --name hello --file hello.rule
aggregator-cli list.rules --verbose --instance inst1
The last command should output
Rule inst1/hello
Write a second text file named close_parent.rule with this content
string message = "";
if (self.Parent != null)
{
    var parent = self.Parent;
    var children = parent.Children;
    if (children.All(c => c.State == "Closed"))
    {
        parent.State = "Closed";
        message = "Parent was closed";
    }
    else
    {
        message = "Parent was already closed";
    }
    parent.Description = parent.Description + " aggregator was here.";
}
return message;
aggregator-cli add.rule --verbose --instance inst1 --name parent --file close_parent.rule
aggregator-cli list.rules --verbose --instance inst1
You may have noted that the name of the Rule can be different from the file name.
Tell Azure DevOps to call the Rules (basic) #
The next commands will add two service hooks to Azure DevOps, each invoking a different Rule, the one we added before.
aggregator-cli map.rule --verbose --project SampleProject --event workitem.created --instance inst1 --rule hello
aggregator-cli map.rule --verbose --project SampleProject --event workitem.updated --instance inst1 --rule parent
The same rule can be triggered by multiple events from different Azure DevOps projects. Currently only these events are supported:workitem.createdworkitem.updatedworkitem.deletedworkitem.restoredworkitem.commented
The list commands below should give the same results. Note the various options for restricting the search.
aggregator-cli list.mappings --verbose --instance inst1
aggregator-cli list.mappings --verbose --project SampleProject
aggregator-cli list.mappings --instance inst1 --project SampleProject
Clean up (basic) #
The first command will delete the Azure Function App and all the webhooks in Azure DevOps.
aggregator-cli uninstall.instance --name inst1 --location westeurope
aggregator-cli logoff
Intermediate example #
This scenario is a middle ground between the Basic and the more Advanced. It is suitable for most cases, including production deployment and automation. It still goes through the four basic configuration steps:
This example assumes that an Azure Resource Group named myRG1 already exists and the Azure account has Contributor permission on it and also to an Azure DevOps Project.
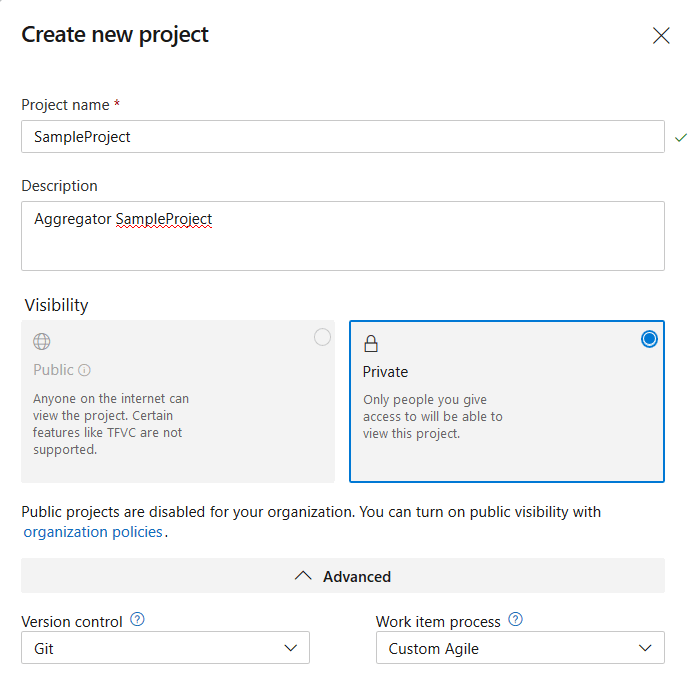
Create an Azure DevOps Project name SampleProject. It must use a custom template, Custom Agile in the screenshots, but you can use a different name.
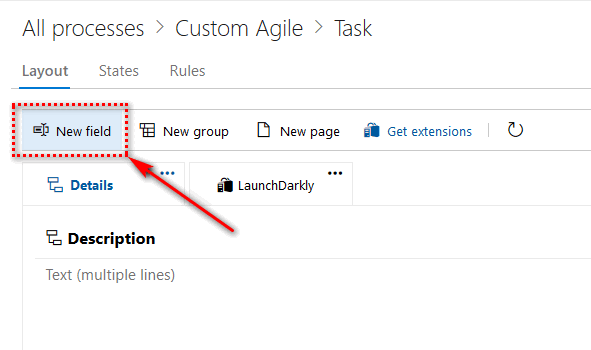
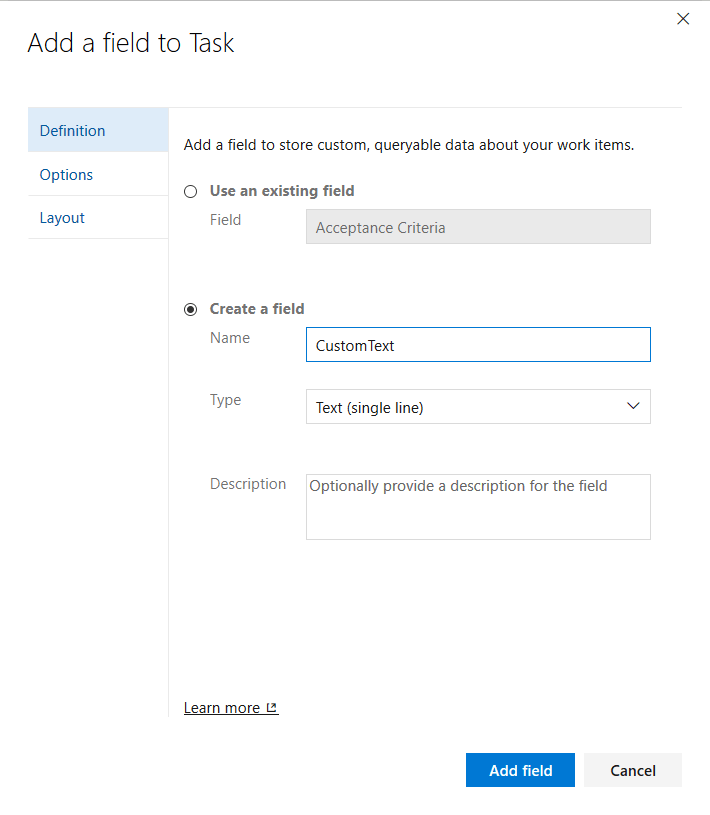
Add a custom field to template Task.
and name the new field CustomText.
 .
.
Logon (intermediate) #
You are required to log into both Azure and ADO. We recommend using logon.env to define credentials data in environment variables.
Using PowerShell (Replace the below asterisks * with valid values.):
$env:AGGREGATOR_SUBSCRIPTIONID = '************'
$env:AGGREGATOR_TENANTID = '************'
$env:AGGREGATOR_CLIENTID = '************'
$env:AGGREGATOR_CLIENTSECRET = '************'
$env:AGGREGATOR_AZDO_URL = "https://dev.azure.com/********"
$env:AGGREGATOR_AZDO_MODE = 'PAT'
$env:AGGREGATOR_AZDO_TOKEN = '***************************************'
aggregator-cli logon.env --verbose
Using bash (Replace the below asterisks * with valid values.):
export AGGREGATOR_SUBSCRIPTIONID = '************'
export AGGREGATOR_TENANTID = '************'
export AGGREGATOR_CLIENTID = '************'
export AGGREGATOR_CLIENTSECRET = '************'
export AGGREGATOR_AZDO_URL = "https://dev.azure.com/********"
export AGGREGATOR_AZDO_MODE = 'PAT'
export AGGREGATOR_AZDO_TOKEN = '***************************************'
aggregator-cli logon.env --verbose
The credentials are cached locally and expire after 2 hours. This approach works well in automation scenarios.
Create the Aggregator Instance (intermediate) #
The next snippet creates a new Aggregator Instance on an existing Resource Group named myRG1 in the West Europe region using a specific Runtime version available in GitHub.
aggregator-cli install.instance --name inst2 --resourceGroup myRG1 --location westeurope --requiredVersion 0.9.14
If you cannot access GitHub, you can download the runtime on a local folder and point to it explicitly.
aggregator-cli install.instance --name inst2 --resourceGroup myRG1 --location westeurope --sourceUrl file://C:/temp/FunctionRuntime.zip
Now, check that the instance is there as expected.
aggregator-cli list.instances --resourceGroup myRG1
An instance is enough for most purposes, we will see in the next section how to manage alternative version of the Rules. In the Advanced scenario we will look at using more than one instance and why.
Add Aggregator Rules (intermediate) #
Again write a text file named hello.rule with this content:
$"Hello { self.WorkItemType } #{ self.Id } - { self.Title }!"
Check if the Rule is correct, by running the code locally. Note that the SampleProject must exists in Azure DevOps, if it doesn’t please use the name of an existing Project.
aggregator-cli invoke.rule --dryrun --project SampleProject --event workitem.created --workItemId 14 --local --source hello.rule
Now, we add the same rule twice with different names. This techniques is a simple way to test alternative versions of a Rule.
aggregator-cli add.rule --verbose --instance inst2 --resourceGroup myRG1 --name hello --file hello.rule
aggregator-cli add.rule --verbose --instance inst2 --resourceGroup myRG1 --name hello-dev --file hello.rule
aggregator-cli list.rules --verbose --instance inst2 --resourceGroup myRG1
The last command should output
Rule inst2/hello
Rule inst2/hello-dev
Tell Azure DevOps to call the Rules (intermediate) #
aggregator-cli map.rule --verbose --project SampleProject --event workitem.updated --instance inst2 --resourceGroup myRG1 --rule hello --filterType Task
aggregator-cli map.rule --verbose --project SampleProject --event workitem.updated --instance inst2 --resourceGroup myRG1 --rule hello-dev --filterType Task --filterFields Custom.CustomText
aggregator-cli configure.rule --verbose --instance inst2 --resourceGroup myRG1 --name hello --disable=true
Now create a Task, save it and update the CustomText field.
The first webhook will see a 404, because the underlying Azure Function is disabled, while the second should succeed.

The second webhook is used only when the CustomText field changes.
To reenable e stop any calls to the dev version of the hello Rule:
aggregator-cli configure.rule --verbose --instance inst2 --resourceGroup myRG1 --name hello --enable=true
aggregator-cli unmap.rule --verbose --project SampleProject --event workitem.updated --instance inst2 --resourceGroup myRG1 --rule hello-dev
Note that you can set less parameter to delete all matching webhooks.
Clean up (intermediate) #
To delete all the object previously created, you simply delete the Instance.
aggregator-cli uninstall.instance --name inst2 --resourceGroup myRG1 --location westeurope
aggregator-cli logoff
The command will automatically remove any mapping (webhook) in Azure DevOps that use the Instance.
Warning
Some Azure Resources are not automatically deleted, namely the AppService Plan, the AppInsights instance and the Storage Account. This is deliberate to support audit.
Advanced example #
The last scenario shows how to control the name of Azure Resources – so you can comply with enterprise policies – and some additional management techniques.
Logon (advanced) #
Authentication does not change from the previous example.
Create the Aggregator Instance (advanced) #
Again write a text file named my-naming-template.json with this content:
{
  "ResourceGroupPrefix": "my",
  "ResourceGroupSuffix": "",
  "FunctionAppPrefix": "",
  "FunctionAppSuffix": "-my",
  "HostingPlanPrefix": "",
  "HostingPlanSuffix": "-my-plan",
  "AppInsightPrefix": "",
  "AppInsightSuffix": "-my-appinsight",
  "StorageAccountPrefix": "strg",
  "StorageAccountSuffix": "12345"
}
and create the Instance
aggregator-cli install.instance --name inst3 --resourceGroup RG1 --namingTemplate my-naming-template.json --location westeurope --requiredVersion latest
You can use a binary store for your artifacts, as long as allows for anonymous download, e.g.
aggregator-cli install.instance --name inst3 --resourceGroup myRG1 --location westeurope --sourceUrl https://artifactory.example.com/artifactory/generic-github-remote/aggregator-cli/v0.9.14/FunctionRuntime.zip
This is an optional step: create another instance with dedicated resources for production workload. There is no hard-and-fast rule if dedicated is better than dynamic allocation: discuss with your Azure Architect the pros and cons of dedicated resources.
WARNING: The cost profile of dedicated resources is very different.
aggregator-cli install.instance --name inst4 --resourceGroup RG1 --namingTemplate my-naming-template.json --location westeurope --hostingPlanTier Premium --hostingPlanSku P1V2
You can see that the resources satisfy the Naming Template.
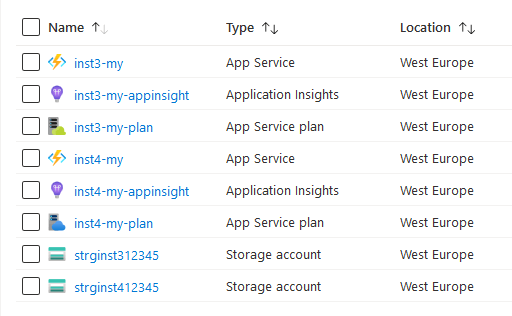
You can scale up or down the compute resources associated with the Plan.
Add an Aggregator Rule (advanced) #
In this example we add a single Rule to serve two events.
Once more, write a new text file named smart-hello.rule with this content:
if (eventType == "workitem.created") {
   return $"Hello new { self.WorkItemType } #{ self.Id } - { self.Title }!";
} else {
   return $"Hi again { self.WorkItemType } #{ self.Id } - { self.Title }!";
}
The next snippet adds two rules where the file parameter is a local file relative to the working directory.
aggregator-cli add.rule --verbose --instance inst3 --resourceGroup RG1 --namingTemplate my-naming-template.json --name smart-hello --file smart-hello.rule
aggregator-cli list.rules --verbose --instance inst3 --resourceGroup RG1 --namingTemplate my-naming-template.json
Tell Azure DevOps to call the Rule (advanced) #
As before, we glue Azure DevOps to the Rules hosted in Azure Functions. Note that both events goes to the same Rule.
aggregator-cli map.rule --verbose --project SampleProject --event workitem.created --instance inst3 --resourceGroup RG1 --namingTemplate my-naming-template.json --rule smart-hello
aggregator-cli map.rule --verbose --project SampleProject --event workitem.updated --instance inst3 --resourceGroup RG1 --namingTemplate my-naming-template.json --rule smart-hello
Now, if you move to the AppInsight instance associated with the Function and run this Query
traces
| where operation_Name=='smart-hello'
| project timestamp, message
You can see the traces collected from the Rule.

Execute Impersonated #
A Rule can use impersonation, that is, instead of authenticating with Azure DevOps as the account who generated the PAT, the Rule can tell Azure DevOps to use the identity of the who generated the event.
Attention: To use this feature, the identity accessing Azure DevOps needs special permissions; see Rule Examples.
aggregator-cli configure.rule --verbose --instance inst3 --resourceGroup RG1 --namingTemplate my-naming-template.json --name smart-hello --enableImpersonate=true
Updating a Rule #
After some time you may want to change a Rule. After testing thoroughly in a development environment, you want to update production with the new version of the Rule.
aggregator-cli update.rule --verbose --instance inst3 --resourceGroup RG1 --namingTemplate my-naming-template.json --name smart-hello --file smart-hello-v2.rule
Careful: updating a Rule may cause downtime.